Here are some possible causes to the problem you describe and some potential cures.
The first involves a question for you and it is when was the last time you had the transmission fluid changed or even checked? It isn’t necessary to change or check the transmission fluid when you swap out an engine because each unit is distinct and separate. Although they depend on each other for proper operation, the engine and transmission are connected through a series of clutches and bands and the torque converter. Their proper operation depends on the level of the automatic transmission fluid. If there isn’t enough automatic transmisson fluid (ATF) available for the torque converter to spin correctly as it tries to initiate the connection between the engine and the transmission, then it will take some time for pressure to build to the proper level so that there is some semblance of proper operation. Even with the pressure built up, if the actual level of ATF is low, there will still be slippage and stalled or no activity.
You will have to make sure that the transmission fluid level is correct to eliminate this as a cause. To do this, park your SUV on a level surface and set the parking brake. Leave the vehicle in N(eutral) — you can use P(ark), however, this isn’t recommended as you will see. Let the engine run for about 20 minutes or until it reaches the proper operating temperature. Then, when it hits the right temp successively put run your transmission through each gear, keeping your foot on the brake as an extra measure of safety. Hold each gear for a minute or so to be sure that fluid has circulated correctly throughout the tranny. Then, pull the transmission dipstick out of its tube, clean it and reinsert it. Note the level of the fluid, using the HOT scale. Be sure that the transmission fluid is between the low mark and the top mark. It is below the low mark, your transmission needs fluid. Purchase a couple of bottles of the proper ATF for your vehicle (most likely Dexron) and then, while the vehicle is still warm and running, carefully add the fluid a bottle at a time. When you have finished the filling with the first bottle, check the level again and, if it is still low, add enough from a second or third bottle to complete the filling. DO NOT OVERFILL the transmission as this can cause problems.
If the transmission is still causing problems after you have added the new fluid, it may be one of two issues: the first is a worn tranny fluid pump and the second is a plugged transmission filter. Since the transmission pump is key to proper operation, if it is worn and not generating proper internal pressure for proper operation, you will have to have the transmission torn down and rebuilt. The reason a rebuild is necessary is that the pump is so integral to the transmission, it is likely that there are other problems hiding, as well, so it will probably need a rebuild. It is best to do the rebuild to ensure that the problem is fixed.
On the other hand, though, it may be just a plugged filter which is easy to replace. Simply have your vehicle raised either on a lift or a pneumatic jack and when it is clear and you can work underneath, place a basin under the vehicle to catch the fluid when you drain it, remove the filler plug and drain the tranny. Next, remove the 14 bolts from the transmission cover and carefully drop it into the basin and let any remaining fluid drip into it, as well. Removing the pan cover will reveal the filter. Take a look at it and you will find that it is likely plugged. Simply remove the filter and replace it with the proper filter. Then, reverse the steps to button the pan up. Last, slowly fill up the transmission with fluid — yes it will be cold right now — and when you reach the number mentioned in either a service manual or your owner’s manual, stop, fire up the engine and let it warm for 20 minutes. Then check the transmission fluid level properly.
Finally, it is possible that there might be a problem with either the pressure regulator or pressure control solenoids. On your Blazer, it might be possible to read the problem on a diagnostic scan tool. If not, you will need to have a pressure gauge attached to each point in the transmission (find them in the service manual) and see when particular circuits have low pressure. Since the regulator and/or solenoids are central to proper transmission operation and since they are also within the transmission, replacing them will likely require a transmission rebuild.
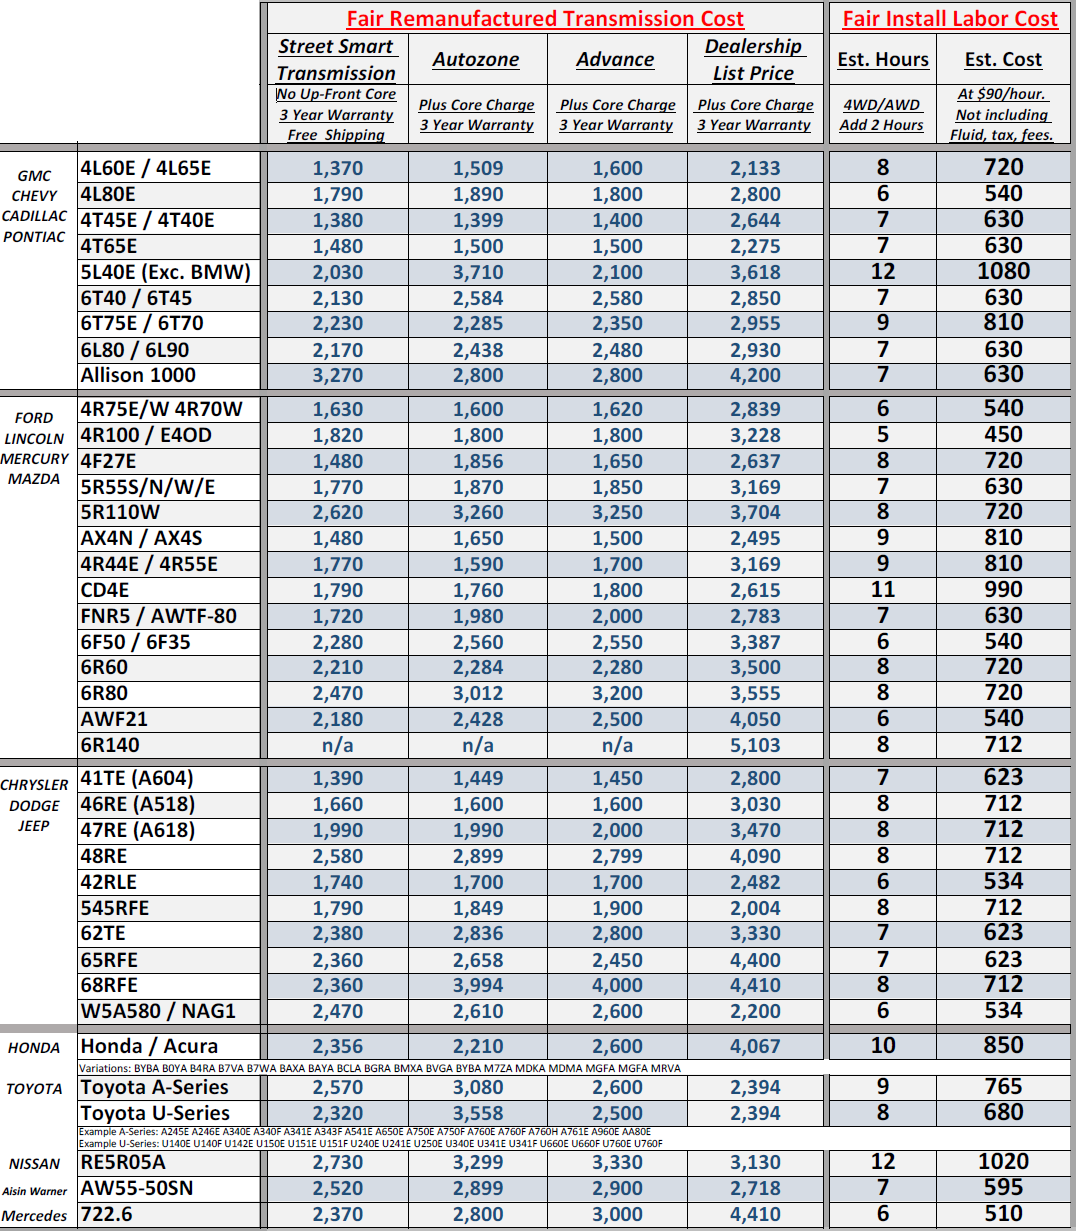
If the problem continues, then you are looking at a total transmission replacement which can add between $2,500 and $3,200 to your total cost.

